
The Do’s and Don’ts of a Fire Pit Table Top
So, if you guys have been hanging out here a while, approximately a year…
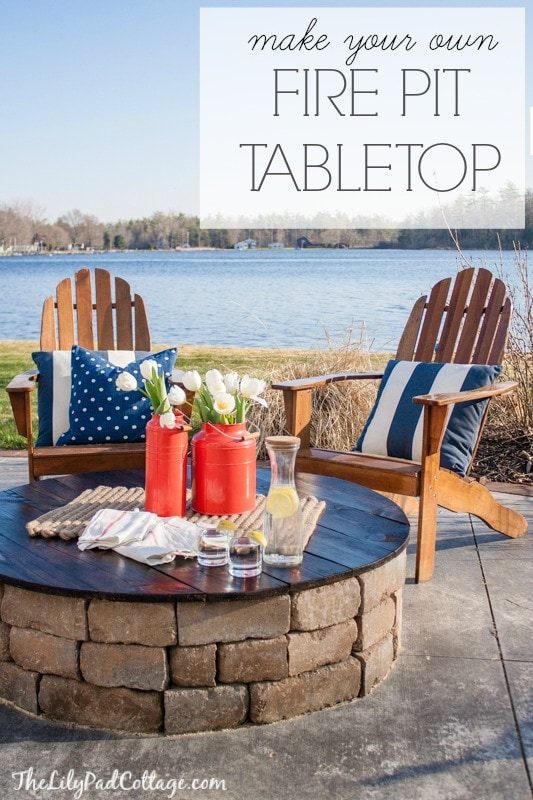
First off, thanks for hanging in with my particular brand of crazy that long, but secondly you may remember the DIY fire pit table top I made last year. It was one of my first forays into the building world with power tools, and no plans, but the ideas bouncing around in my little noggin. I told the Mr. what I was planning to build and he was sure he was going to come home from work to find me in a puddle of tears, with a botched project and possibly a missing finger or two. BUT… shockingly, I not only kept all my limbs safely attached to my body, built a super functional yet totally cute table AND it became one of my most crazy popular posts that I still get questions all the time about!
I thought I would do a little recap of DO’S and DON’TS and what I would maybe do different this time around if I was building one again.
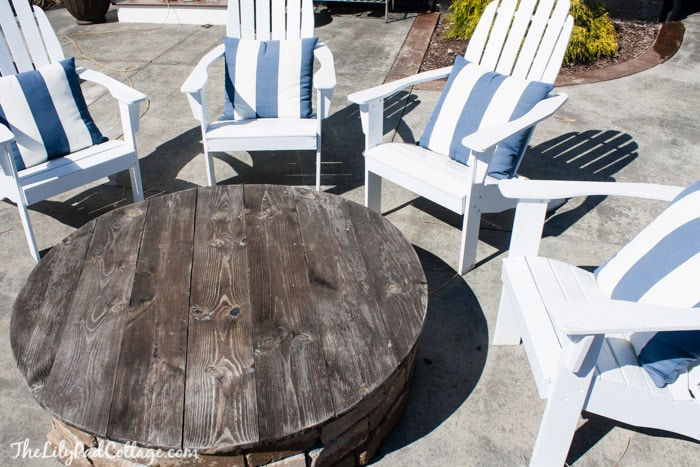
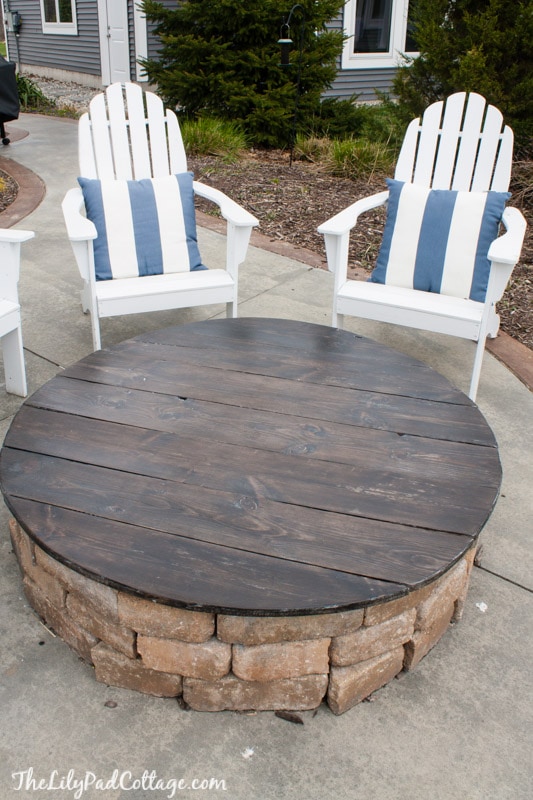
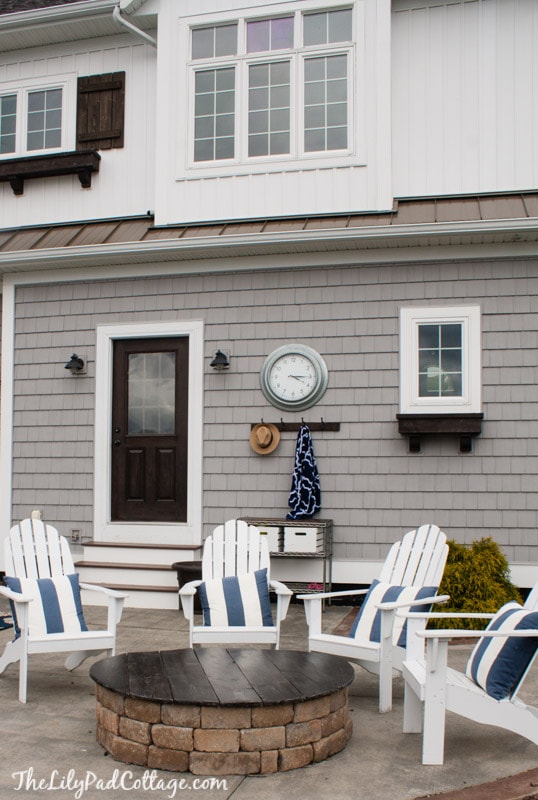
Let’s start with the obvious DO – DO build this table!! Guys, I can’t even tell you how much we used this table last summer, probably way more than we used the actual fire pit. It’s so handy when we are having a lot of people over to have an extra table to eat at, plus it makes a great kid table when we are having a nicer dinner party. Not to mention a fantastic ottoman when I want to kick my feet up at the end of a long day.
DON’T leave it outside all winter long, ahem…I had really good intentions of storing this thing in the garage for the winter, but I lost all motivation when we got like a foot of snow before Thanksgiving and I never really thought about it again til April.
When it looked like this :(
NO worries though, I sanded it down (or enlisted my favorite little chick who has suddenly taken an interest in power tools, clearly I’m doing something right in the parenting department!)
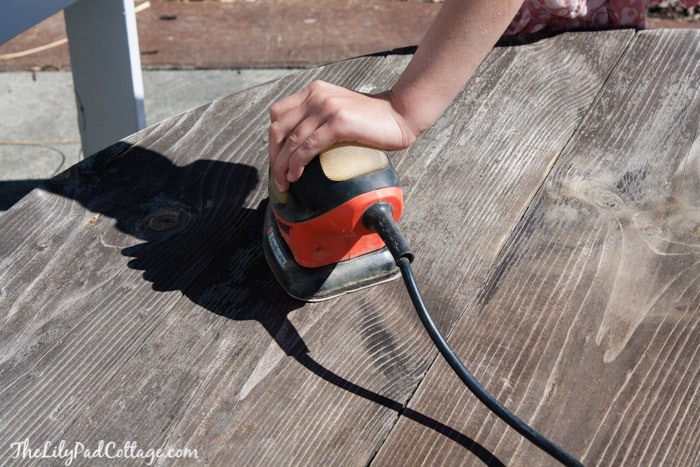
I slapped another coat of stain on it. 2 coats of outdoor polyurethane later and it looks good as new!!
Another possible DO, you could totally use some sort of pressure treated wood or decking material to make this and eliminate any worry of moisture issues!
DON’T ever put this on your fire pit when it’s still remotely hot, I had several emails from worried readers that putting a wooden cover over a fire pit isn’t a good idea. The Mr. and I always pour water over our fire when we are done and then leave the cover off til the next morning when the fire pit is 100% completely cool. This completes “the Smokey the Bear only you can prevent forest fires” warning…
DO put a few more screws/brackets on than I did. You’ll see on the original post that I put about 6 brackets across the back and as the summer went on, the combo of heat and rain along with the fact that I used regular old wood boards and not treated caused them to warp a bit. I added 2 more smaller brackets on the ends and it’s back to good as new.
DO seal the top and the bottom. CONFESSION – sometimes (most of the time) I take shortcuts cuz I consider myself the laziest DIY-er on the planet. I had to get this thing done, so I only stained and sealed the top of the table. Well, all summer long water could sneak down between the cracks and get absorbed on the underside causing part of my warping problem. If I would have just sealed the bottom part too that would have helped immensely.
So moral of the story, build this, it’s awesome, but possibly use better materials than I did or just properly seal it, and enjoy!
Oh and while we are taking a trip down memory lane, do you remember the chairs I painted with my paint sprayer? Look! They are still going strong! High fives all around! Check it out here, if you have furniture you need to save too.
PS I’m off on a girls trip the rest of the week with some of my favorite chicks, the Mr. will be riding solo with the kids and I envision some sort of scary Lord of The Flies scene when I get home, but it will be worth every minute to refresh and have fun with my friends. So, it’ll be a bit quiet over here, but I’m in the middle of redoing my mudroom completely cuz I woke up one morning and grabbed a paintbrush whoops… I’ll be sharing all the details on that when I get back – stay tuned!


I found and old table top and used it for my fire pit cover. (It actually fit!) I painted a checkerboard on it. Took an old wooden closet rod, sliced it up and painted them black and red. I bought oversized chess pieces as well. (I’m not handy enough to carve my own.)
oh that is such a fun idea!
I suggest that you reconsider the use of treated wood for the top. Firstly it is full of nasty chemicals. Secondly without a finish (sealer not stain) it will dry and splinter and warp. Check out southern yellow pine which resists water intrusion and takes sealer well. It is available at most good lumber yards (maybe not the box stores). Great idea and thanks for the hints about letting the fire pit fully cool.
Hello! Is there a DIY tutorial? If so, would you mind sharing the URL? Thank you!
https://www.thelilypadcottage.com/2014/04/diy-fire-pit-table-top.html here you go!
I love this idea! We bought a kit with intentions of building a paver patio around it… talk about lazy DIYers as well, we just want to put it on the concrete pad we already have. I noticed you did the game thing. Did you put anything down to protect the concrete? Thanks for the great cover idea!
We had a hole cut into the concrete so it’s just dirt underneath – thanks!
I agree with most of your suggestions. Mine has survived 2 winters so far. I used the cedar wood from my kids old swing set to build this and still got some water damage myself. My “Do” would be to put plastic over the top if you plan to leave it out for the winter. Also plan on resealing it every year. The time it takes to seal it is minimal and it will look like new. Thanks again for this great fire pit table idea. I still get compliments from my neighbors every time they see it.
Great tip thanks!
You have to cut a hole to let the water settle down from rain or when you put out the fire
Did you have to do anything to the concrete before building the fire pit on it? Trying to plan building ours this spring.
Thanks
We had a hole cut in our concrete so it’s not actually sitting right on the concrete, I would recommend that.
We are having a concrete patio poured for a hot tub and I would love to add a firepit and four chairs like yours on the one side. I wondering what the footprint patio size is needed for a setup similar to yours. Can you give me a ball park size of what it would take to fit your 4ft firepit and chairs? We may be cutting it close with our current plans and may need to expand it, but this just looks like heaven and I’d love to be able to do this down the line!
Hmm, I’m not totally sure what our patio is! I’m guessing there is a good 4 ft all the way around it though? You could always just put chairs on one side otherwise to help make it fit! Good luck with your project!
Have fun with the girls!! thx for taking us down memory lane!! ;-)
Thanks Lisa we had a great time!
First of all: Have Fun!
Secondly, I always appreciate posts that post about the test of time and refine their process.
Thanks. :)
I loved it when you first posted it and I’m always appreciative of updates on projects. We want to build a better fire pit this summer and love the table idea. Anytime a project can serve two purposes it’s a good thing. Have fun on your trip too.
Thanks Becky!
I love your fire pit and the table top is sheer genius. You might think about sewing some kind of cut table top that fits like a shower cap so that it doesn’t get all that rain. A shower cap for a fire pit — hey that would work. Get some of that beautiful sunbrella type material that matches your blues, make a casing around the edge, then have some kind of cording that you can pull snug :-)
Ha, that’s a great idea!
That is an awesome idea. I’ll be attempting that this weekend
LOVE this post!!! We have a fire pit and making a table for it is on our list this year! Great tips!
Thanks Yvonne, I know yours will be beautiful just like everything you do!