
Customizing Builder Basic Cabinets
I somehow, accidentally, on purpose, made over our master bathroom the other week. These things tend to happen when the Mr. goes out of town for the week. I like to make poor life choices like leftover pizza for breakfast, staying up til 3 am watching Gilmore Girls, and taking on huge building projects, because he’s not here to complain…hehehe.

Although technically I had kinda, sorta run it by him while he was half asleep several months ago (the best time to have important life conversations I find), I’ll explain further in the next few weeks when I share the whole makeover, but today let’s talk cabinets!
When building a house one of the most expensive items in your budget tends to be cabinetry. There are so many fun options and beautiful things you can do. Unfortunately when we built 5 years ago we were on a tight budget and after our initial cabinet price came back (and I had a good cry, while the Mr. passed out) we had to cut and slash all fun things and go with the basic option. Slowly over the past 5 years I’ve made some changes to the cabinetry to make it more custom, like adding the glass cabinets above the kitchen cabinets (see here). It was finally time for the master bathroom to get it’s turn. Here’s the before –
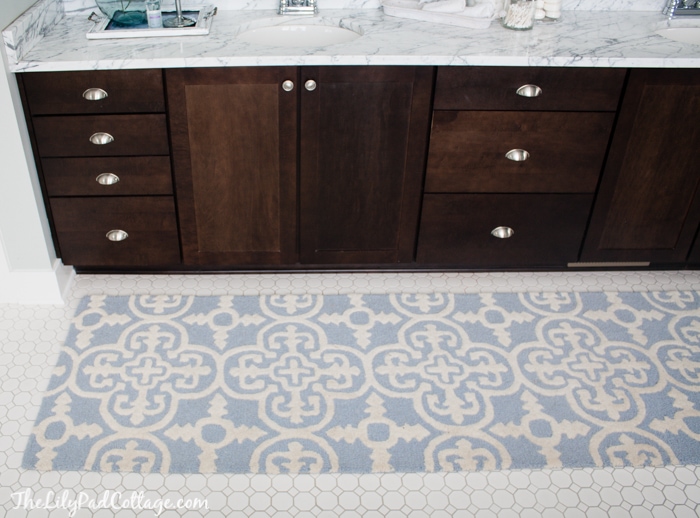
Our bathroom is very long and narrow and we have a huge vanity. It’s 11 ft long and I was giddy with the idea of so much storage and so many drawers. So giddy that I didn’t really take into consideration that we didn’t really have that much bathroom stuff, despite my current 6o zillion tubes of mascara. Also that it would look like a big blah wall of cabinets. After the last 5 years of the bottom drawers sitting empty I just decided to up and rip them out.

I wanted it to look more open like those beautiful custom looking furniture pieces with the cute baskets from Pottery Barn.
All I did was remove the drawer faces, unscrew the drawer tracks and fill in the holes. Of course now I needed to paint everything since the inside of the cabinets weren’t walnut. I was so ready for a lighter color in here! Truth be told this dark espresso color just felt a little too formal for the rest of our house and the other truth be told Buddy attacked one of the cabinets and it had huge scratches on it so it looked pretty cruddy anyways. Some of you may take issue with me painting practically brand new walnut cabinets (some of you may refer to the Mr. as well, ahem) but they were so dinged up and marked up they looked awful (the before photo above was when they were brand new and shiny!). I’ll tell you I never realized that white cabinetry would clean up SO much better than dark. You can see every single finger print and scratch on them.
I went with the same gray paint that I used on the mudroom cabinets and the playroom board and batten and I love the fresh new feel in here.

Next I added these little feet to keep working toward that unique piece of furniture look. I picked up these bun feet from Lowes, I think they were about $5 each? I then screwed them into square pieces of wood I cut from some scrap wood in the garage.

They weren’t quite tall enough to meet up with the bottom of our cabinets on their own. I just used my nail gun to secure them to the cabinets through the top.

I found these baskets that fit perfect in my openings at Target. The middle opening I stacked with a bunch of our extra towels which is nice because it made some extra room in the linen closet for non pretty things I want to hide. Now the baskets house my curling irons and blowdryers and we actually use them. Well, the Mr.’s is still empty but at least it looks pretty!
I can’t wait to show you the rest of the room soon, I’m just shopping for a few finishing touches yet! Can you believe what a difference a little paint and rearranging makes?

Are you sure this is Benjamin Moore’s Arctic Gray? I had it made today and it looks way lighter than what your vanity looks like?
The wall color is Arctic Gray the cabinets were the darker gray color I mentioned. I don’t remember offhand as this post is from our old house and a few years old – thanks!
Hi, great remodel. Can you tell me what color paint you used on your cabinets?
As one who also waits for the man to leave for a few hours (or days) to attack a new decorating idea, I love your creativity. The bathroom looks lovely. I’m on my way to buy bun feet for our kitchen cabinets while he’s golfing! Thanks for sharing your inspirations with us.
haha good luck!
This is one of my favorite furniture colors!! I love what you have done here. Inspiring blog, Thank you!!
Thank you Ariana!
Hi. I just found you on pinterest and this post about your bathroom makeover. I think I read every post regarding this bathroom paint color at least three times hoping you mention the name of the paint color but you never mentioned the brand or color. Will you please forward this information? It is the exact color I am looking for. Thank you!
Kelley
Its arctic grey by benjamin moore – thanks!
Is the color of the cabinet artic grey or the walls? One post says the walls but this post is talking about the cabinets so I wasn’t sure.
Hi Angie oh man this post is for our old house and about 5 years old I’m not actually sure anymore I believe that the wall color!
I just saw this post and I love what you did. Love the color, bun legs, and basket drawers. It looks really pretty. Ps I love Gilmore Girls. I even purchased the last 8 episodes I had never seen. Did you know they are bringing it back on at Netflex. Can’t wait to see alot of the old cast.
YES I CANNOT WAIT FOR IT TO COME BACK TO NETFLIX!!! Ok sorry for shouting but yes I can’t wait ;)
Love this!
Okay….off the wall question. I saw where you ordered your hammock from etsy….Are you happy with the style you chose or have any second thoughts about getting the more traditional one with the wood slat at the top and bottom so it is wider? I have small kids like you and wanted to see your thoughts before purchasing one cause I’m sure I won’t be alone in it?
Thanks girl!
Nikki
I love it Kelly!! looks beautiful! Hopefully your hubby does too ;-)
Hi Kelly, 1st I love your posts when you post ;) and I LOVE your house, the outlook means the environment you live in !!!!
Your remodeling of your vanity looks gorgeous in grey – very nice hue -much better than before!!! A clever idea to attach the bun feets under it and with the new open spaces now it has more farmhouse style.
My best DIY ideas or buyings I make is when my hubby is working and the apartment is under my power. When he comes home I present him with a fait accompli, lol, but honestly most of the times he likes it…
I’m really digging the idea of grey cabinetry in the bathroom, and I really like how it draws out the veining in marble. I think I want to add a grey floor to ceiling cabinet in our guest bathroom soon, but pulling the trigger is sometimes hard. What if I don’t like it? Ugh! Decisions!
I think what you did is spectacular! Wonderful idea and a beautiful face lift! Kathleen in Az
I love it! It looks amazing and totally changes the look! Glad to see a new post from you :)
Love it! I’ve been thinking of adding bun feet to my bathroom cabinets.
I was surprised at how easy it was, wish I had done it sooner!
Please tell me how you paint your cabinets. They look sprayed. I hate when you can see the brush marks. Love your site. I have a lake home and dream of decorating it just like yours.
Hi Quinn, I actually have a sprayer but I opted not to mess with it this time. I bought a high quality cabinet paint from a local paint store, washed my cabinets extremely well, and then applied thin even coats with a mini roller. Sanding in between coats. It also helps to turn the temp down in your home to avoid brush strokes. I had really good luck with this method, although spraying is great too. I just didn’t want to deal with the clean up this time!
Hmmm, plotting … plotting. ;)
hahaha :)
Your story telling is impeccable! You make me giggle every time. Loving the gorgeous grey!
That’s very true!
Thanks friend, I can’t wait to see what you do in your new house! I’m dying over the salon already!
This is gorgeous! Absolutely love the color!
Thanks! Glad I talked the MR. into it kind of!
Love the color!!! We are purchasing 2 homes to flip and this will definitely be on our list to paint and update cabinets. Also, you’re from Michifan!!! I am a fellow Michifander as well living in Bay City. So happy I subscribed to this blog! It is beautiful!
OH fun Laura, I would love to flip a house! It’s on the to do list sometime when my kiddos are in school full time! Have fun!
Okay, fess up!! You gave The Mr something to make him sleep so you could have a very intelligent conversation while he was sawing logs. Right?? I love what you’ve done and My Honey and I have been there when we had to cut — waaaaaaaaay down while remodeling. My tastes far exceeds our budget :-( And this is really a terrible confession — I haven’t done anything to the house because what I want and what we can afford don’t mesh. So I’ve been in the kitchen doing what I love — cooking. Anyway, I’m looking forward to seeing the rest of your bathroom transformation.
Hahaha promise I didn’t slip him anything :) Sometimes it’s better to ask for forgiveness than permission…
Looks fabulous! Where is the rug from?
Hey Kelli, I got it on sale at World Market a few weeks ago for $50! It’s so think and comfortable too.
I have been dying to do this to my master bathroom. How hard is it to prep/paint the cabinets? I’m assuming two coats of paint does the trick? It looks fabulous! I can’t wait to see the the rest of the bathroom.
Hey Denise, it’s definitely not the easiest task if you want to do it right but it’s totally worth it, just be sure to buy high quality paint! 2 coats did the trick with sanding in between and I used a mini roller as much as possible, less brush strokes that way.
Once again success! It looks great Kelly.
Thank you Beth!
What a huge difference this update makes, the color change is very chic and the empty space with towels, etc really charming … The feet are genius and look totally custom ! Very clever!
Thanks Kris, I love how much the lighter color warmed up the space, can’t wait to share the rest!
Clever lady you are with the feet and drawer removal. Love the look. Paint color is perfect with your counter. You always do such amazing work on your home. I love every inch of it that you have shared.
It is good to see a post from you, I have missed them.
Thanks Doreen, I’m trying to be more regular but life is kicking my butt a little these days. Maybe I’ll bore you all with the details in a post soon :) thanks for waiting on me!