
Ikea Tarva Hack – my new night stands
We have been in the market for some new night stands for, well, ever. We had been using the same mismatched hand me down pair from my parents that I have repainted no less than 36 times since we we got married. I woke up this past weekend and just couldn’t handle it for one more minute! Luckily we were headed to the east side of the state to visit friends so I talked the Mr. into swinging by Ikea – just to look around (bah ha ha ha insert my evil laugh here…)
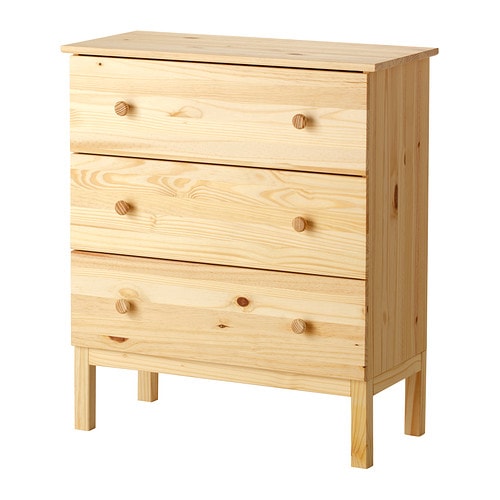
Unfortunately we weren’t finding any night stands we liked so we decided to cruise the rest of the furniture just for fun, when we happened upon the Tarva dresser (you can find it here on Ikea).
Did you guys see the fun contest that BHG just ran with some of my favorite bloggers where they had them makeover a Tarva dresser? They had such fun ideas and I loved the way they turned out. I pointed them out to the Mr. and told him all about the contest. I thought his eyes were glazing over with all the decor talk, but apparently he was actually listening because he said
“why don’t you just cut the legs off and make them into nightstands for us?”
Wait, what? Did the Mr. just suggest a DIY project?! I know, I’m rubbing off on him :)
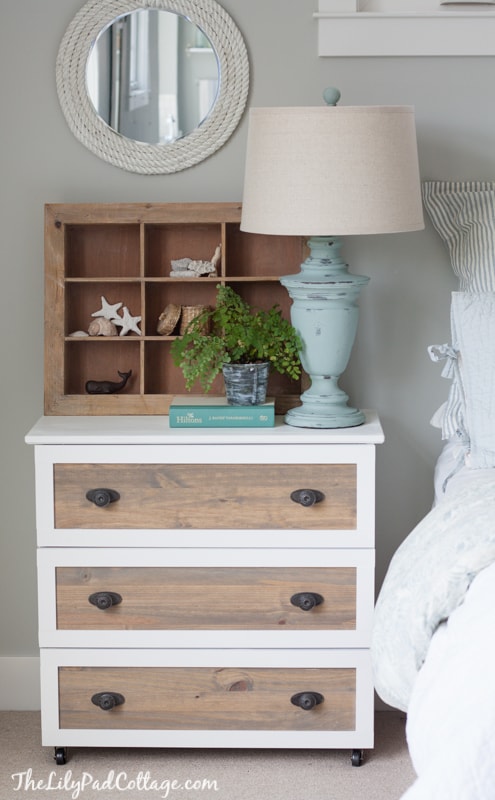
We took a closer look, measured, and realized we wouldn’t need to actually cut off the legs, we could just leave them off along with about a 2 inch apron on the front. That brought it down to the perfect size for night stands and I could hardly wait to get these things home and figure out what I wanted to do to them.

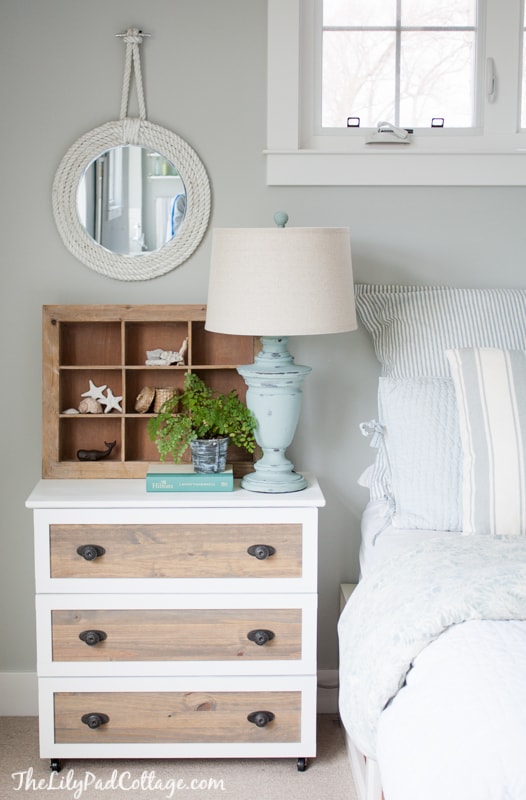
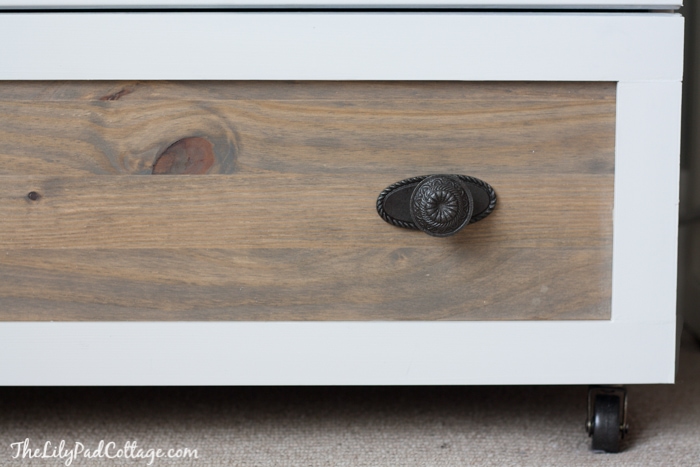
I decided I wanted to keep some of the natural wood showing, so I applied a coat of wood conditioner. Then I stained the drawers, first with a coat of Weathered Grey stain by Rustoleum and then went over them again with Early American by Minwax (I just had both these stains on hand). This gave me the perfect beachy driftwood color I was going for.
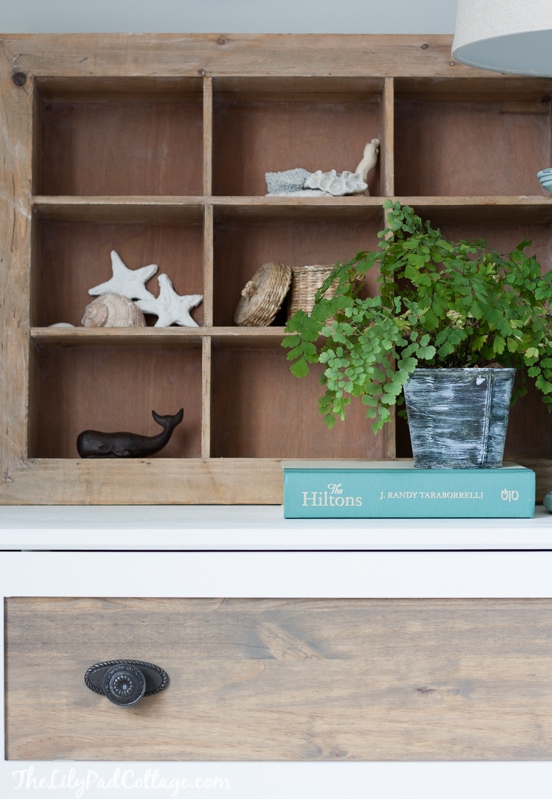
Next I glued white moulding around the edge of each drawer and painted the top and sides Silent White by Clark+Kensington. I picked up some half off hardware at Hobby Lobby and was good to go!
Until I realized that our heating vents were now trapped underneath the new nightstands…yeah, I pretty much made a warming drawer for my underwear and the rest of the bedroom was freezing…
So I headed to the hardware store and picked up a couple sets of wheels. I sprayed painted them oil rubbed bronze and screwed them on the bottom. Perfect, that lifted the night stands just enough to let the air pass under, but not too high to make them look weird with our bed.
Speaking of bed, you may notice a sneak peek at our new (to us) bed in here. It was in the downstairs guest room and I swapped out my DIY Upholstered Bed with this one for a change. And yes, I’ve been hiding the fact that I have a guest room, because basically it’s just a dumping ground for all my unwanted decor and throw pillow collection… I’m not showing the full reveal yet, because I’m building a headboard for it as we speak…

and now you are thinking wait a minute, aren’t you supposed to be sharing your living room redo sometime soon? And weren’t you in the middle of redoing your daughter’s room too? Yes, and yes…sigh still waiting on the tile guy to come finish my fireplace so I can show you the living room. And I’m still working on finding the perfect finishing touches for my girlie’s room, so naturally it’s an excellent time to overhaul the master bedroom too…
Am I driving you nuts yet? I’m hoping to get the decorating ADD under control soon and reveal all the new rooms, which basically at this point is my whole house! So stay tuned…
In the mean time I’m excited about the changes in our room and I think the night stands go perfect with my chalk painted lamps. Oh and there are 2, I made one for the Mr. too but his isn’t done yet because Hobby Lobby ran out of the hardware I used…
I hope all you mom’s out there have a great Mother’s Day weekend, and if you missed my post yesterday – check it out and give yourself a pat on the back :)


Don’t know if I missed it but didn’t see a path to the instructions. Please let me know where to find them.
Beautiful work. I have the Ikea Rast and will be replicating your look this weekend.
Keep sharing your beautiful work. Thanks for sharing.
Hi Judy I didn’t really share any specific instructions because I just sort of winged this one.
I just want to tell you THANK YOU for sharing this great idea! I made these several months ago and still love them so much I wanted to thank you personally. I used the same hardware from Hobby Lobby, but instead of putting wheels on I just used the wood drawer pulls that came with the dresser, painted them and used wood glue to attach them (wide side up) to each corner on the bottom of the dresser so the bottom drawer wouldn’t drag against the carpet. With the carpet, you can’t even see them. Like you, I just used stain that I had on hand for the drawer fronts…I used Minwax Dark Walnut and then whitewashed it with some watered down white paint. They are just the perfect touch in our bedroom and look like we spent so much more on them. Plus, I feel pretty darn proud of myself for making them! Thank you!!!
OH great Lori, I’m so glad to hear this! I love it when someone actually finds something I did useful ha :) Go you, you should feel proud!!
I know you posted this quite a while ago but I was wondering if you could tell me the dimensions of the molding that she used on the front of the dresser
I think they are about an inch wide? Thanks!
I love these and would never have believed they were from Ikea for such a reasonable price! Coincidentally, I’ve been looking at a chest of drawers that are white with wood stained front drawers that I love, but it was $677.00! I may just try this….the only part I was’t clear about was the trim you put on the drawer front…..was that nailed on? I am clueless and my husband is worse, but at that price, I’m willing to give it a try! Any pointers on the trim you can offer?
You are mighty talented. And I do love your taste….thank you!
Annmarie.
Hi Annmarie, I just used liquid nails and some clamps. You could probably use heavy books resting on the drawers over night if you don’t have clamps.
We just bought two of these to makeover and I came across your post! Wondering how you trimmed the bottom without having to cut the legs??? Did you just cut all the way around to make it even on the bottom? I can’t figure out how you did it without having to put the legs on at all! Gorgeous makeover.
I didn’t put the legs on or the like apron front part if I remember right. Eek sorry this was a long time ago!
Hello there, I love that little whale accessory. Where did it come from?
My friend Allison picked it up for me at a flea market, thanks!
Thank you thank you!! I just picked up a new (to us) wardrobe type thing to re-do for the daughters room. She had one of these dressers in there that I’m trying to think of where to move to in the house. Just so happens we have been looking for night stands for our room FOREVER as well so this would be a great idea!! Now to see if the husband likes the idea…
Oh great! Good luck convincing your husband :)
I love your ideas for the dresser. Did you add plywood or anything to the bottom before adding the rollers? Or did you just add them directly to the bottom.
Directly to the bottom, I think there is a pretty sturdy base there for them to attach to if I remember right.
Hello! I love the stain on these night stands and am trying to replicate it for a coffee table. In the post you said you did the gray and then the early american over top, but I saw a comment where you said you did the opposite. Can you just clarify which order you did the stains! Thanks so much.
Love this! Where or where did you get your bedding???
Pottery Barn :)
Hi Kelly!
Absolutely love the result! And beach style warms heart on a cold fall evening. I have a question – what is the wooden thing with shells and deer? It’s soo adorable!
It’s a shadow box I picked up at Homegoods, I like to keep little trinkets in there my kids find for me ;)
It’s such a great part of the whole picture and it inspired me to look for a shadow box. Thank you! :)
This project is exactly what I’ve been looking for!!!! I just moved into a new apartment that is partially furnished. I have a bed, but no dresser (the huge armoire does have a bit of drawer space) or nightstands. I don’t want to spend money on 3 pieces of furniture so I have been thinking about larger nightstands with drawers. This is perfect for me in so many ways: drawer space, larger nightstands (I don’t like small ones), and a project (which I love) all wrapped into one. I’m heading directly to IKEA! Thanks so much for the inspiration!
oh yay! You will love them, they have so much storage!
Love this color, the turned out adorable! I used the weathered grey stain on two adirondack chairs and just love that stain. But for the tarva dresser I want it more of a grey/brown, came across your post and it’s perfect.
So to clarify on how you did the color, you’d recommend mixing the two for the first coat, then go over it another time with just the grey? Or go over first with the brown only (no mixing), then grey only? TIA!!
Oh and do you happen to have a picture of the dresser from before you put the moulding on? Would be awesome to see the entire dresser with the stain color since that’s how I’d do it. (I’d be doing the bigger tarva dresser for a nursery).
Hi Kelly,
Great job. Thinking of doing something similar. Would love to know the dimensions of the dresser without the legs on it.
Thanks
I love it!!! Are you able to tell me what the heigh of the night stand came out to without the legs? I want to try and do this, but the Ikea is about 2 hrs away so I just want to make sure the height will work with my bed before i make the drive out there! Thanks!
Nevermind..i just saw someone asked you the same question earlier!
Hi! How exactly did you go about using two stains on the nightstand? I love the color and want to replicate for my Tarva furniture, but want to make sure I execute correctly!
Hi Sam,
I actually first tried a mix of them half and half together in a cup but wasn’t really getting the result I wanted. I then brushed the grey back over it and it was perfect. Just do one coat then wipe it off, do a a coat of the gray over top and wipe it off. Does that make sense?
I made a similar bed, can you tell me where you got your baskets for the storage areas of your bed?
They are from Pottery Barn.
Where is your bed from?
I loveeeeee this!!
What color paint did you use on the walls?
Arctic Grey by Benjamin Moore
Love the makeover! I’ve been eyeing the Tarvas for my bedroom as well, but worry that they would be too tall…without the legs how tall did your end up being?
Hi Elie, they are about 30 inches tall with the wheels on it, they would be about 28 without the wheels. :)
Love your night stands! And oh too funny…I have DIY/decorating ADD too. You sound exactly like me!! ;) Too many projects (but I seem to still find a way to start another..and another…and so on!)
Nancy
Oh it’s a problem! Good thing I can blame it on the blog ha :)
I love these. This is a fabulous DIY project. They look perfect, I can’t wait to try them!
Thanks Shelby!
I love the way this turned out! Kelly can you please share what kind of molding you used for the nightstands and the process for attaching it? We’re looking for a dresser for our master bedroom and I might try this on the 6 drawer tarva. Thanks!
Hi Bridget, it’s just one inch primed thin white wood, not sure what to call it exactly. Found it in the trim section at Lowes. As far as attaching it I just used liquid nails and clamped them in place, but you could probably just use some heavy books to weigh them down too until they have dried. Hope that helps!
Oh my gosh Kelly! This is so beautiful! EVERYTHING is amazing in your room and I love your bed! I wish I had ADD décor problems. I WISH I had your energy!!! Your blog is definitely one of my top favorites. Your style is AMAZING! I’m in love with that dresser you made over (the knobs and the wood stain and trip) and the rope mirror, and your bed linens….and EVERYTHING. I might just have to copy everything! hehehe.
Copy away :) trying to find that energy today – so far I have managed coffee and email ha!
This is beautiful! I love how it turned out!
It looks amazing Kelly!! I love that you kept some of the wood tones. I don’t know how you manage to have so many projects on the go but you always manage to pull it off! xo
Gah!! I have lazily been surfing around Pinterest tonight, and I just found THIS AH-MAZING DRESSER there… and I tracked it back to your blog… and now I’m not getting a dadgum thing done at my house, because listen: I have taken your house tour… I’ve read all about you… I’ve looked at numerous posts you’ve put up… and all of that makes me sound like I might be a crazy blog stalker, but that’s just simply NOT the case. I have a teenage boy and a two-year-old boy, and between driving the thirteen-year-old everywhere and cleaning up the toddler’s messes, I just don’t have time to be a crazy blog stalker! But I will tell you this: Jesus did NOT give me the spiritual gift of decorating… and I LOVE and also ADORE your decorating style… so I’ve decided that I should just invite you over for coffee some morning. And when we’re done sitting at my dining room table, sipping hot beverages, you can just tell me, “Do you know what? Let’s redecorate YOUR house! I want you to throw THIS rug away… and I want you buy THIS rug instead, and it’s all going to look fantastic together, because I’m a professional and I know what I’m doing!” And then I would take ALL of your advice, because sweet mercy! Your house is darling! Happy Mother’s Day!
Ok first – Jedi Mama = best name ever, 2nd – yes we should def be friends or mutual crazy blog stalkers? Just read your blog and was giggling like a crazy person…3rd – after reading about your little dude and his toilet adventures we need to keep our kids away from each other because they could probably rob a bank together if left to their own devices…4th – I’m not sure we would ever get to redecorating your house because we would be too busy laughing :)
Well… I guess it’s settled then. We’ll just be new BFFs, and our toddlers will corrupt one another. On the plus side, the dollars they steal from the bank together can totally be put toward Pottery Barn rugs and all-things-Target!!
I like the way you think…
So beautiful! Such a gorgeous hack – I love the white and wood-tone mix!
Thanks Sarah! I was so excited they turned out like they looked in my head – which is not always the case… ha
Wow, it looks so good!! We just redid the large 6-drawer tarva for my boys room (stained front, navy frame, brushed nickel cup pulls) and I can’t get over how good it looks. I love looking at tarva hacks — it’s an amazing and versatile piece of furniture. Yours looks so beautiful, we may do the same for our night stands as well!!
Hi Candace, love the sounds of your tarva hack! It’s kind of addicting to redo them right? I’m still dreaming of ideas for more :)
Beautiful!
Thanks mom!
Girl! I LOVE these in a big fat way! Good job, they are perfect!
Thanks Rebecca!! I was pretty crazy thrilled when I was done with them too ha :)
Oh my word..these turned out amazing Kelly! I NEED to get to an Ikea!!
Thanks girl, yes a trip to Ikea is always in order :)
Don’t worry I have the same condition – ADD decorating! Right now I have a double dresser right in the middle of the living room that I’m painting in chalk paint. Other projects in the basement and office and still haven’t finished the sunroom – painting and floor…. Anyway, LOVE these little nightstands. Beachy and chic. Yay!
OH glad to hear my brain isn’t the only one that bounced around from room to room and project to project :)
These are perfect! I might have to steal your idea!! What was the overall height of these when done?
hey Molly, they are about 30 inches tall.
Love, love, love this, Kelly!! You can’t even tell it’s the same dresser! And it looks perfect in your bedroom! :)
yayyy!!! I LOVE these! Those wheels are absolute perfection!
Beautiful job Kelly! They look SO perfect for you room! I quite enjoy your decorating ADD. Makes me feel more normal. :) Happy Mother’s Day weekend cutie!
xx
Oh Kelly – I must know where your beautiful lamps are from! I adore the look of the wood on the nightstand… just love the entire look… Beautiful!
Hey Brandi, I picked them up at HomeGoods! I’ve seen them there a few times so hopefully you have luck finding something similar.
Those night stands look amazing! Such an awesome hack. Your decorating ADD reminds me of…well…me. I always have a million projects on the brain at one time.
I need to have at least 6 projects going on at once, somehow it keeps me sane…or relatively :)
I know how you feel, however none of mine ever seem to get completely done. I still have picture frames hanging on my gallery wall that don’t have pictures in them. :P
I am in looooove with these nighstands! So ecited to see this hack!
Thanks Lisa! So excited to have real matching night stands now.
These are super cute! Now contemplating the same hack for our room!
Go for it, it was so easy!
Beautiful! I love how the stain turned out!
This totally makes me want to pick one (or two) up for my boys’ bedrooms.
An IKEA trip is in order… they need to get one on this side of the state STAT.
These would be perfect for a kids room, I kind of want a few more for all over the house…
These look great! Also, yesterdays post was awesome – happy Mother’s Day!
Thanks so much Melissa, hope you had a great day today!
I have total decorating ADD. All the time. Love how these came out, especially with the little wheels – definitely a happy accident there!
Love happy accidents, thanks girl!